In Minecraft Bedrock Edition, you can play online multiplayer by joining a public server or by hosting your own through Minecraft‘s Realms system. Realms are perfect if you’ve got a small group of friends wishing to play together, so today we’ll show you how to set up a Minecraft Realms server for Minecraft Bedrock Edition!
How to Set Up a Realm in Minecraft Bedrock Edition
Setting up your own Realm is easy, no matter which platform you’re on! Please keep in mind however that setting up a Realm requires you to purchase a monthly subscription priced at 7.99 USD. You get a 30-day free trial, then after that, you’ll be charged every month your Realm stays active.
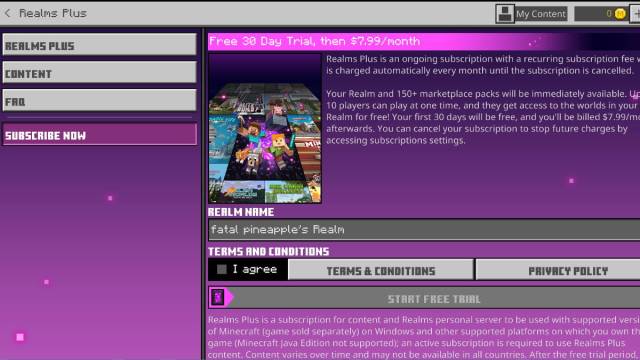
To get started, simply enter the Play menu, and you should see an option under Realms. Click on it, and you’ll be taken to the Realms Plus page. Click on the Subscribe Now button on the left side of the screen. You can give your Realm a name before you finalize the purchase. Once you agree to the terms & conditions, click on the Start Free Trial button to finalize your payment info.
Related | How to Download Minecraft Bedrock Beta on iOS
Your user interface might look a little different, as this screenshot was captured using the Windows 10 version of Minecraft Bedrock Edition. The process should be relatively the same though, so you shouldn’t have too much trouble.
Once you hit the Start Free Trial button, your Realm server is now operational! You can send out invites to your friends, who will then have permanent access to your Realm as long as the server is running or until you revoke their invite. Personal Realms can have up to ten players on them at a time, and players can join regardless of whether the Realm owner is online or not.
Have fun in your new Realm! If you have any other tips or tricks to share, let us know in the comments below!




Published: Jan 13, 2022 09:09 pm