When you have game that’s titled “Raid HQ,” then you should definitely expect to get your base raided over and over again, right? Well, that’s usually the case, but I am here to help you fend off those attacks and keep your base – and resources – safe for as long as possible. For that, I will share with you some Raid HQ base design ideas: suggestions on how to place your buildings and defenses around your base in order to prevent your opponents from winning the battles and draining resources off you. Make sure to also check out our general tips and tricks to find out new stuff that might be helpful in the game.
Now regarding the Raid HQ base designs and ideas on how to build the perfect one, things are relatively simple in my opinion. I managed to build up my defenses and position them in such a way that most attacks don’t stand a chance. Here’s how my attacks list looks like after a while of not playing:
Pretty impressive, right? It sure is and those guys were certainly not expecting such a loss. Therefore, here are the rules that you must have in mind when building your defenses:
– Defend all routes (2 when you start, but more will be added as you level up your HQ). Many players go for defending just one route heavily and completely ignore the other. That’s not a good way to go if you want to rack up those Trophies and win battles!
– It appears that the more buildings you have on a route, the more of your resources the enemy will get if the attack is successful. It doesn’t seem to matter if you have mines or silos or whatever: the more buildings, the bigger the percentage of resources that attackers can get. I am not 100% sure about this, but it seems so. In other words, don’t worry about your silos and mines to your defense. You won’t save a ton of gold by simply not having it on the route!
– Apart for these generic things to know, my #1 golden rule for a perfect defense is to use all your buildings for defense purposes. Anything you have, place it in front of the attackers to slow them down and drive them crazy. Use everything in order to increase your chances of surviving attacks. Just from having more buildings that enemies have to take down, you will bring their attacking heroes’ health down and your chances of having them killed increase.
– As part of the tip above: NEVER keep your defensive turrets outside of a path. I’ve seen players keep them between their two lanes in order to get the bonus attack on both sides, but this is a losing strategy, because if you keep a turret outside, the enemy heroes won’t stop to attack it and you basically lose an important battle. Have all your turrets place on paths!
– Another extremely important strategy is this: place your non-combat buildings first and keep the towers (Mortar, Minigun etc) second. In other words, let the attackers get frustrated and potentially have their health lowered with buildings that don’t matter much and fully hit them afterwards. Another advantage of going this route is that your turrets will still offer some sort of extra fire for those other buildings: each turret that you tap (or mines) have a red area around them: that shows you the area of effect for that particular weapon and if you have any buildings in this area, as long as they’re on the path enemy Heroes will take, that particular weapon will bring in extra firepower (like those rockets that appear out of nowhere when you play).
-This is why the best strategy is to keep your higher range weapons (like the Mortar) towards the end, so they provide the biggest defensive value. If a turret is destroyed, it will obviously not provide any more backup fire. So if the Mortar is first, even though on your base all the buildings coming next are in its range, they won’t benefit from the bonus because, well, the Mortar is destroyed!
– Mines are extremely important! Stepping on a mine will absolutely destroy the health of the incoming heroes. That’s why I use this strategy: I hit the Shuffle button on both routes until they are very close by (as you will see in the screenshot of my base below). The closer your routes, the more defensive bonuses you can get from the same weapons on all routes. Then I place the mines in such a way that: a) at lest on one route there are two mines working together, meaning that the enemy heroes will surely get a ton of damage; b) as many of my turrets/weapons as possible are in the area of effect of the mines. Using mines with non-defensive buildings like Silos or Mines is not worth it because there’s little movement in those cases and the mines can be easily dodged. But when you have mines, incoming Mortar fire, fire from the Flame Thrower AND the troops defending your area, then the enemy will surely have a horrible time!
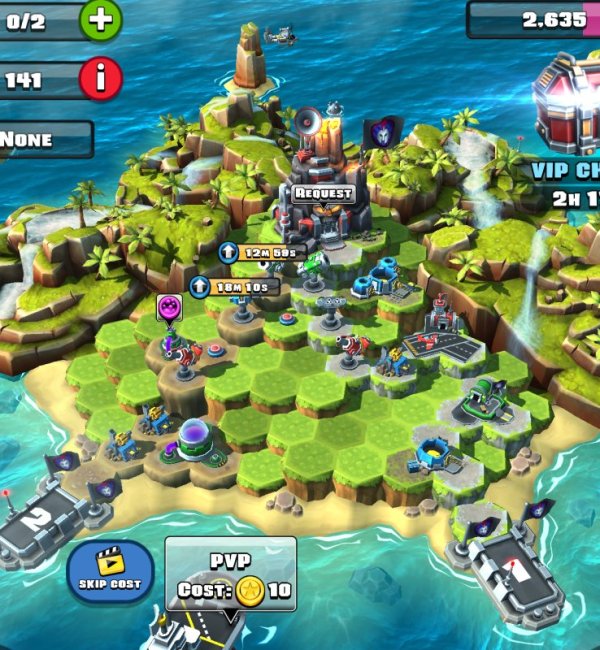
– Finally, here is an example of my base. Notice that I cleaned all the debris ASAP in order to have options when it comes to placing my troops and buildings and you should do that as well:
My base is very good, especially the #2 lane (which seems to be the one that the game offers as a first attacking choice by default and many people don’t change it) and as you saw in the first screenshot, it can really stand the test of multiple attacks without a problem. So build yours similarly and follow the tips above and you will have a perfect base!








Published: May 23, 2016 06:51 am