With nothing buy hopes, dreams and the trusty sword on his back, Jorj the mighty StoneGrinder braves the treacherous Grindstone Mountain in hopes of striking riches from within the depths of the mountain…
Grindstone is a puzzle RPG battler where Jorj must match same color enemies to strike them down, causing precious grindstones to fall from the inner walls of the mountain. Collect grindstones, slay monsters, and stay alive in this exciting puzzle RPG!
In our Grindstone tips and tricks guide, we will go over the basics of survival and how to improve your odds of success. We will also go over the material and challenges system, so let’s get started with our Grindstone tips and tricks strategy guide to surviving Grindstone Mountain!
The Basics of Chaining
Jorj can only start an attack chain of one color monsters that are around him. Lining up the same color monsters over time is the key to victory in the long run, so knowing how to manipulate the board and chain is crucial!
To start off with, Jorj must kill at least ten monsters for a grindstone to spawn. Of course, you can chain higher if it is possible, as that will result in more grindstones. Making big chains is easy at first since you do not have that many obstacles to deal with, but as you progress it gets gradually harder.
When you take an enemy out, Jorj will remain in the spot where you move to. However, all empty spots will be filled in by the monsters above. They will drop down so that the entire board is filled at the end of the turn, and new monsters will spawn in from the top.
If you want to make big chains on the more complex boards, you will need to purposely try to “fill in” sections of the board with the same type of monster. You want to attempt this with monsters that are already on the board, as the new monsters you get in from the top are randomly chosen, so you will not know what you will get.
Once you get this done and work around the obstacles on the board, you can set yourself up with big chains, and that means even bigger grindstones!
Grindstones: The Key to Multichaining
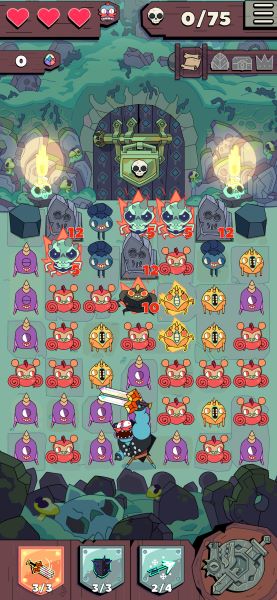
Once you throw in a grindstone into the mix, there is no limit to your chains. As you know, grindstones can be thrown into a chain to turn your next move into a wild card, which lets you re-target any color of monsters of your choice for that next set of attacks.
With proper use, grindstones can let you make huge chains of 15+ monsters, and that means even more grindstones at the end of it. As such, it is important that you try to make as many grindstones as soon as possible.
The sooner you make a grindstone, the more chances you will be able to create a big chain to set off the “chain snowball”. It just takes that first one then you can go from there.
When you create a grindstone, it will spawn on a random tile on the board. Do not bother going for it to pick it up, as it will automatically be collected if you exit the level. Instead, leave it where it is so that you can use it for potential chains. Grindstones (and other items for that matter) are not moved around at the end of a turn, so you do not have to worry about that.
Getting New Gear and Materials
A few levels in will unlock the Armory and the gear system. Jorj can equip up to three pieces of gear to arm himself for the dangers within Grindstone Mountain. There are four types of gear in total.
- Swords enable Jorj to use special attacks, like the Spinny Sword that attacks all surrounding tiles.
- Shields will defend Jorj from attacks at the end of his turn. Certain shields can even inflict effects upon enemies.
- Arrows are ranged attacks that can damage enemies from afar or inflict special effects upon them.
- Potions grant special effects that the other pieces of gear cannot, like a Jump Potion that lets Jorj go anywhere he wants. (By the way, the Jump Potion is REALLY good and we recommend it being one of the staples of your gear selection.)
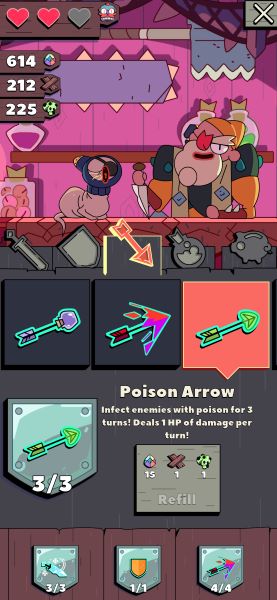
Gear also has different methods of recharging. Swords and shields will automatically recharge once you finish a level, but potions and arrows must be refilled using materials. Be sure to replenish your stock before heading into a new level.
In order to get new gear, Jorj must find blueprints that are hidden within certain levels. You may get them for simply beating the level, but sometimes you need to go after the treasure chest that is in the level.
You will also need to gather raw materials and monster parts to craft new gear. The first instances of this are the wooden scraps you need to build the basic shield, which is gathered by breaking wooden boxes found in the level. Like grindstones, any materials left on the floor will be automatically collected when you exit the level.
Treasure Chests and Challenges
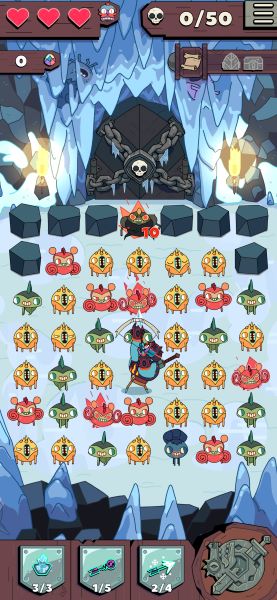
Most levels also have a treasure chest that spawns after a certain amount of turns have passed. If you hit the level goal and open the exit door, the treasure chest will spawn in automatically.
Go for the monster with the key as fast as you can and make your way to the chest. Remember that the longer you stay after the exit door has opened, more monsters will become enraged after each turn. Stay too long and the entire level will be enraged, ensuring your demise.
Treasure chests will contain a small amount of materials, which is always helpful, but sometimes they will contain blue prints like we mentioned before, so it is always best to try for the chest.
Another way to score some materials is to complete challenges. You can see your currently assigned challenges from the Tavern. Think of them as this game’s version of achievements, as they will require you to do things like hit a certain number of chains, clear a level under a certain amount of moves, and so forth.
When you complete a challenge, you are presented with three different rewards, usually grindstones and some other materials. You get to pick one of the three, so choose wisely!
Dealing with Monster Attacks
At the end of your turn, a random selection of monsters on the board will become enraged, as indicated by their fiery aura. These monsters are prepped to attack, and if you end your turn while in their reach, Jorj will suffer a hit. Three hits and he is a goner!
You can tap on any monster to see their attack range, as denoted by the red tiles. Staying out of affected tiles is the easiest way to evade attacks, but killing the enraged monsters is the best option. If you leave enraged monsters alone for too long, eventually the whole board will turn on you and there will be no more safe spots.
Remember that you can also block hits by activating the shield on your turn. Do this if you absolutely need to be somewhere that requires you to stand by an enraged monster.
The small fry are easy enough to deal with, but as you progress through the game you will encounter more complex enemies, such as the gravestones that convert regular enemies into stronger skeleton monsters. There are even swarms of bats that will hide in their cave and shoot out across a row to attack you.
Study each special enemy carefully, and remember that you do not need to kill them all in order to proceed unless the level specifically requires you to do so. Work towards the objective and take out the enemy if they are going to present a problem in the long run.
Bosses require different strategies
Progress enough through the adventure and you will come across one of the game’s many boss battles. These guys require a little more strategy than your typical enemy, so be sure to study the environment.
For example, the very first boss cannot be damaged through normal means. What you need to do is knock back those bombs it spawns on the map back into it. The higher your chain is, the more the bomb will be knocked back.
Each boss has little gimmicks like this, and they are usually a key part in actually damaging the boss. Keep your eyes out, watch what the bosses do, and you should be fine!
And with that concludes our guide on Grindstone. If you have any other tips or tricks to share, let us know in the comments below!




Published: Feb 20, 2020 01:57 pm