Nintendo is finally allowing players to organize their installed games and software and categorize them into groups through Nintendo Switch’s 14.0.0 version update. Switch users have been clamoring for this feature since the beginning of time.
Recommended Videos
Before this update, players were forced to limit their organization through the acknowledgment of the general labels that the system provided, such as the date last played and the software title.
Switch users are able to create up to 100 groups that can include 200 titles per group. Each software can be included in multiple groups at once as well.
If you want to know how to create groups on the Nintendo Switch version 14.0.0, continue reading this guide!
How to Create Groups of Software in Nintendo Switch’s Ver. 14.0.0 Update

Follow the exact steps below to create a group:
- Make sure your Nintendo Switch system has been updated to version 14.0.0 or later
- Make sure it has 13 or more pieces of software installed.
- On the Home menu, scroll all the way to the right
- Select “All Software.”
- Press the L Button to view your software by group (or open the Group menu for the first time)
- The first time you create a group, an image will appear showing you how to make a new group.
- You’ll get a popup where you can select Create New Group.
- After creating your first group, simply use the + Button to create a new group.
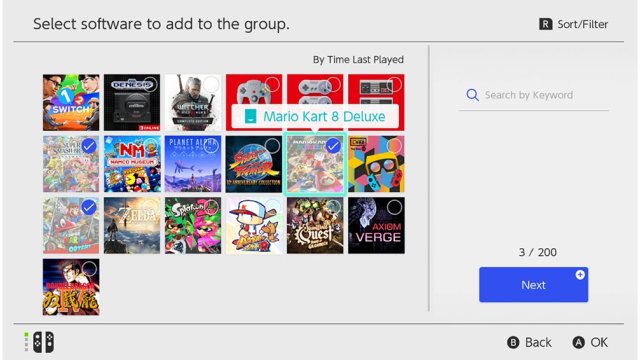
- From your installed software list, select the items you want to add to a group.
- Finalize your selection by clicking “Next.”
- Re-arrange the software titles if you want to.
- Finalize your selection by clicking “Next.”
- Name your group.


Published: Mar 23, 2022 01:55 am