Idle Death Knight is a new idle game starring a skeleton with an attitude! Grow your Death Knight from a lowly little skeleton into a powerful warrior by upgrading him with awesome weapons and sturdy shields. Teach him some skills and watch the enemies get cut down! In our Idle Death Knight tips and tricks strategy guide we’ll go over all the important mechanics of the game and how to make the most of your gold!
Powering Up Death Knight
From the character tab, tap on the level button to bring yourself to Death Knight’s core levels. You simply pay the required coins and DK’s level increases, increasing his attack and HP. The other attributes will eventually increase as well. This is the quickest and most straightforward way of powering up, so do this first.
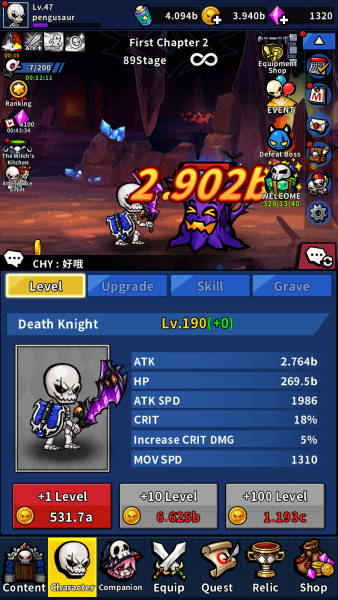
While still in the character tab, tap on the upgrade button to be brought to DK’s upgrade levels. DK can be upgraded using milk – yes, it does a body good – to give himself substantial attack boosts. After upgrading with milk enough times you can evolve DK, which grants him a massive stat boost. Evolution requires a lot of milk plus dark orbs, a somewhat rare material.
Finally, the last tab contains DK’s skills. Once learned, DK will use skills automatically to help him in battle. Skills are great for amplifying your damage output so make sure you keep up with them by upgrading them with milk.
Related | Idle Death Knight Codes
Understanding the Gear System
The other way to power up DK is to outfit him with gear. DK can use weapons and shields during battle, increasing his attack power and HP respectively. Higher rarity gear also increases his stats as well.
To earn gear, you must acquire equipment tickets. These can be obtained by progressing through the chapters and clearing certain missions. Once you have at least one ticket, you can stop by the equipment shop to draw random weapons or shields. You can do a single draw (1 ticket), draw x11 (10 tickets), and draw x33 (30 tickets). You can perform a draw at any point, but it’s better to wait until you have at 30 tickets to do the 33 draw, as you essentially get three free draws. You can draw for gear using amethysts, but we recommend saving for relics and other important things.
You’ll get a random assortment of weapons or shields, depending on what type of draw you did. Gear comes in two classifications: rarity and stars. Rarity goes from D and 1 star being the worst to SSS and 5 stars being the best.
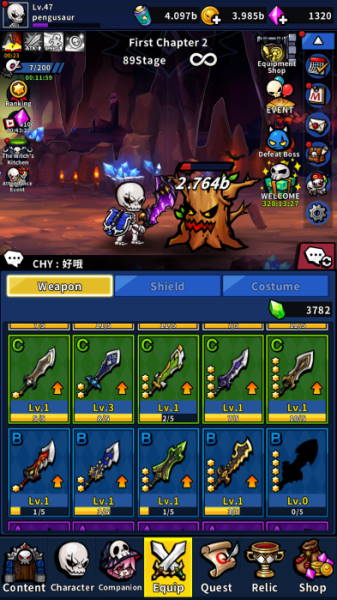
Always equip gear with the highest rarity and stars. You also get increased attributes for simply having the gear in your inventory without it being equipped, though you get more for equipping. You should draw often to fill your collection for nice stat boosts – they might not be much on their own, but collectively it is quite substantial.
You may have noticed that gear has “unlocked upon transcend” listed under the owned bonuses. The owned bonus will tell you what it is right away, but it won’t activate until the gear in question is transcended. Transcendence can occur when a weapon or shield is fully upgraded using those green upgrade stones.
Before you can fully transcend a piece of gear, you must have enough transcend stones equal to the gear’s rarity. Transcend stones come in seven different types, one for each rarity level. You must dismantle unwanted gear in order to receive trasncend stones equal to the sacrificed gear’s rarity. For example dismantling a D-tier sword will reward you with D-level transcend stones.
In general, it’s best to not waste upgrade stones on low tier gear, despite the owning bonuses looking really nice. Try to upgrade only gear that is at least A-tier or better. You get a lot of upgrade stones early on but they start to slow down substantially once you’ve progressed far enough.
Additionally, you can combine five copies of the same piece of gear to get the next gear in the tier. So, combining five copies of a D-tier 1-star sword will get you the D-tier 2-star sword.
Farming for Resources
If you’re looking to fill out your pockets with more gold, make sure that you’re upgrading your quests. Quests are basically passive income – purchase a quest and upgrade it, then wait for the time to run out to get paid. The more quests you have, the more money you’ll make over time. Invest in more quests if you find yourself running out of gold too often.
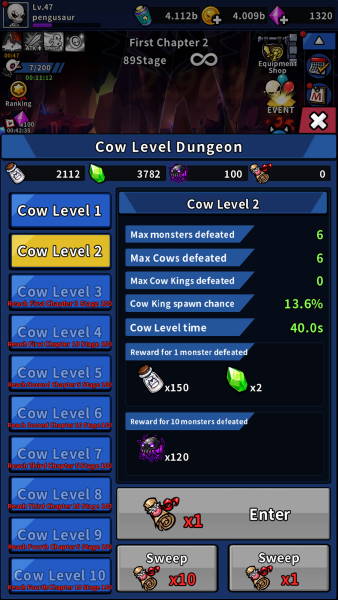
Once you get your hands on cow level dungeon ticket, you can enter and take down some beefy cows. You can earn lots of milk, upgrade stones, and dark orbs in the cow dungeon depending on how many cows you manage to take down before your time is up. You only get a few tickets a day, so make each attempt count!
Another important resource are batteries. You’ll get these from defeating enemies as you progress, but one important thing is to upgrade your current costume. Your owned costumes determine how much batteries enemies will drop. Head on over to the character tab and tap on costume to see. You’ll notice that the better costumes cost amethysts and they also increase the battery bonus.
The battery bonus from costumes all stack with each other, so you should try to at least own all of the 2,000 amethyst costumes, then upgrade them as much as you can. You’ll be earning lots of batteries, and you’re going to need them in the future.
Obtaining Relics
Relics are powerful artifacts that grant you permanent bonuses. Relics can be acquired at 300 amethysts a pop, and they can be bought at anytime. There are exactly 30 relics to discover, so if you want all of them you’ll have to fork over a whopping 9,000 amethysts!
If you’re familiar with idle games, then you probably already know the important of relics. These kinds of things always scale better than just about any upgrade method in the game, so it’s wise early on to invest in relics. You’ll thank yourself later when you have a bunch of permanent upgrades to your DK. Relics should be your first priority when you’re choosing what to spend your amethysts on.
Acquiring more Amethysts
Amethysts, the purple gems you’ve been collecting here and there, are this game’s premium currency. Amethysts are used for a variety of purchases, many of which make things much more efficient for you. One of the best way to get more amethysts is to complete the list of missions given to you every day. You must:
- Defeat 100 monsters
- Acquire 1 bone
- Use 1 cow level ticket
- Use 5 upgrade stone boxes
- Draw weapons from the equipment shop
- Defeat 5 Skeleton Birds
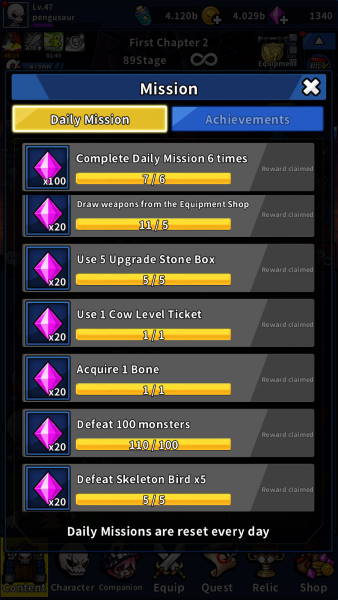
You will most likely complete almost all of these naturally simply by playing the game for a few minutes. The only one that is slightly difficult to complete is the “Defeat skeleton bird” mission, as this will require you to pay active attention to the game. Every now and then a skeletal bird will fly across the screen holding a present – tapping it will make it drop a nice item for you and also give you credit towards the mission.
Each daily is worth 20 amethysts, and when you complete all of them you get a bonus 100 amethysts, so completing a full day’s worth of missions will net you 220 amethysts. You’ll need a lot, so make a habit of completing the daily missions as much as possible.
Don’t forget to claim your achievements as well. Idle Death Knight has the same kind of stacking achievements, which means that you can claim the same achievement multiple times by simply fulfilling it again a second time.
There’s also a little timer bonus button on the left side of the screen that awards you for simply playing the game. It will contiously count down and when it’s done, you can collect your rewards. The first rewards is amethysts, then it switches to something else for the second round, then it switches back to amethysts again. Be sure to collect it as soon as you see it so that you get your timer started for the next reward.
That concludes our guide on Idle Death Knight. If you have any other tips or tricks to share, let us know in the comments below!








Published: Mar 23, 2021 02:55 am