Roblox offers an intricate template feature to make avatar clothing, including shirts. You can either use your created clothing for your own Avatar or Sell them on the Roblox platform. Whatever is the case, you should first know how to make Shirts in Roblox.
Related | Best Roblox Games of 2021
How to Make Shirts in Roblox
To make a Shirt in Roblox, players need the Shirt Template. Once they have the shirt template that they can find below. Open the template image with any image editor and edit the required boxes with your own design. Players can use online editors like GIMP or Paint.Net.
Now fill the boxes(UP, R, L, BACK, DOWN, etc) with your design.
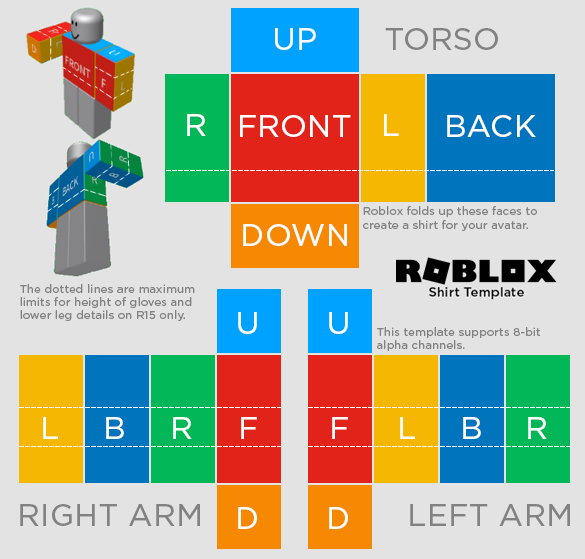
Once the editing part is done. It’s time to upload your design and get it verified from the Roblox team.
How to Upload yours Shirts in Roblox
Before we move on to the upload process, make sure your edited shirt template dimension is 585 pixels wide and 559 pixels tall. Anything other than that will result in an error while uploading your shirt design.
Assuming you have got the right dimensions, follow these simple steps to upload you shirt on Roblox.
- Visit the Roblox website.
- Log in to your account.
- Select Create option.
- Select the Avatar option from the left column menu.
- Select Clothing–> Shirt.
- Click on create option available on the right side.
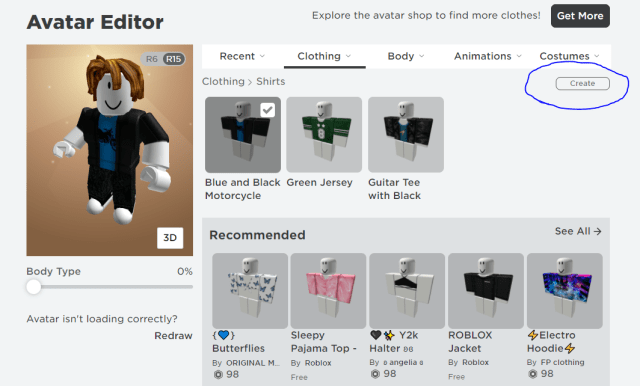
- Upload your shirt design.
- Chose a name for your design.
- Click on Upload to finalize the process.
Roblox is an online game platform and game creation system currently available on PC, Xbox One, Android, iOS, macOS, Fire OS, and Classic Mac OS.


Published: Jun 9, 2021 9:17 PM UTC